You have already decided what kind of fence you need, now the next step is to determine where you will put it. Be sure of your boundaries, check local laws and regulations pertaining to fencing and locate any potential hazards, both natural and man-made, such as underground utility lines and overhead electric wires. Make sure the fence path is clear of brush and debris. Once you're ready, install all end and corner posts. Next, run out a single guide wire to help assure a straight fence line. This wire will become the bottom wire of the fence and serves as a guide for setting the line post.
Attach the guide wire to both end posts. Use a chain grab wirepuller or an in-line strainer to pull the guide wire taut (about 100 pounds tension). For safety's sake, wear appropriate clothing, heavy leather gloves and eye protection when working with any wire fence and, when driving posts or operating other power equipment, wear hearing protection. If the terrain is hilly, drive the rise and dip post first and staple the guide wire to them before setting the line posts.
Setting the post(s)
Check the chart, which gives suggested post space distances for the type of fence that you are building. In most cases, the use of Kiwi Droppers® will allow you to reduce the cost by increasing the distance between posts.
Posts, small end down, can be mechanically driven with a hydraulic post driver or set using an auger-drilled pilot hole and rammed into place. Posts can be handset but driven posts have about five times the holding strength of handset posts.
If you hand set posts for brace assemblies, set the end post in concrete to keep it from uplifting. Dig the hole with a bell-bottom. Before you place the post, hammer a ring of staples, driven half way in, around the end of the post about 2 inches from the bottom. Place the post and tamp in tightly 8 inches of dry concrete mix. The soil moisture will cause it to set up. Fill the remaining hole with tightly tamped dirt to ground level. For gatepost, add an additional 8 inches of dry concrete mix 18 inches from the top of the hole. Fill the hole with dirt to ground level, tamping tightly.
To prevent overturning a post in soft soil and lifting of a post in a dip, increase the post length and drive deeper; again, check the chart.
Brace assemblies
The ASAE (American Society of Agricultural Engineers) recommends a double brace end assembly for American soil conditions. A double brace is rated at 9,000-lbs. pullover resistance and is more suitable for longer runs and larger livestock. Single brace assemblies can be used for fences of six wires or less. You can increase the holding ability of a brace assembly by increasing the length of the top horizontal post. Recently, a new double brace has become popular, which has the holding properties of a traditional double brace, but affords a cost savings in materials and labor. Drive a 6"x8' end/corner post but then use 4"x7' posts for the rest of the brace. The key is that the brace wire extends in a double wrap from the bottom of the end/corner post to the brace pin on the second brace post. To make the job neater, double figure 8 the brace wire.
Corners and changes in direction
A corner can be made using a common end post and building two brace assemblies at an angle from that end post. To reduce material costs, corners may be constructed using post leaning against the pull of the wire: For every 10-degree directional change, use a 4" x 8' post on a 4" lean, 4' deep; for every 20-degree change, use a 5" x 9' post on a 5" lean, 4 1/2' deep; for every 30-degree change, use a 6" x 9' post on a 6" lean, 5' deep. Drive the post by machine on a lean or to the bend. With either type of corner, string the wire to the outside of the bend, or any curve in the fence for that matter.
Stringing the wire
Once the line posts are set, mark them for the proper wire spacing, and string the remaining wires. A spinning jenny or multi-wire fencer will make handling the wire easier.
For electrification, slide on the required number and type of insulators. Staple the wire accurately to its mark at all corners, major dips and rises, and at the post next to where you will install the in-line strainers. These points will create some friction. The in-line strainers should be installed near the middle of these friction points.
To ease installation, attach a chain grab wire puller to the wire at least four feet from a post, pull out the slack, cut the wire and use crimping sleeves to secure the strainer. Thread the other end of the wire through the hole in the drum, cut off the surplus. With the handle turn the drum until no slack remains. Use one tension indicator spring for each set of in-line strainers.
Joining and tying off wire
You can join wire by manually tying a knot but a knot in the wire will reduce the wire strength by a minimum of 30%. It is better to join wire with a mechanical wire link or three crimping sleeves; both create a joint as strong as the wire. To anchor wire at the end, as in joining wire, you can knot the wire but you reduce its strength. The better way to anchor the wire is to use two crimping sleeves or drill holes into the end post and use a wire vise mechanism, which has a tapered barrel that firmly holds the wire.
Stapling
Before stapling the remaining line posts, tension the wire taut, about 100 pounds, using the in-line strainers. This will prevent crossed wires and aid in positioning the wire. To reduce pullout use 1 1/4 - to - 2 - inch long, 8 or 9 gauge slash cut, electro-coated galvanized staples with barbs. If you rotate the staple 30 to 45 degrees away from the flat face, you will prevent the post from splitting and the staple leg will spread, curving outward from the flat face for greater holding power. Drive staples at an upward angle into posts in dips and at a downward angle into posts on rises. The staple should allow the wires to move back and forth freely. Staple the wire to the livestock side but on the outside of corners and curves.
Tensioning the wire
One in-line strainer per wire can tension 4, 000 linear feet of high tensile wire on a straight-line fence over level terrain. To calculate the number of in-line strainers needed add 500 feet for each corner, severe dip, rise or curve to the total linear feet of your fencing project. Divide this total by 4,000, round the answer up to the nearest whole number (for example, 1.3 = 2) and multiply by the number of wires on your fence (2 x 6 wires = 12 strainers or two sets). Tensioning from the top wire down will provide clearance for turning the in-line handle. Use the wire with the tension indicator spring attached as a guide to tension the other wires. Pull the wire towards you and tighten until all the wires have the same "feel" (resistance). After a day or so the fence will set, check each wire and if necessary, correct the tension to the recommended 250-lb. pull.
Grounding non-electric fence
All fences utilizing steel wire on nonconductive posts must be grounded for safety from lightning. Drive a galvanized steel post, 3/4 - inch galvanized steel pipe or an approved ground rod at least 3 feet into the ground, not more than 300 feet apart (150 feet in dry, rocky soil). Attach 5 strands of galvanized wire to the rod and lace through each fence wire. Bend the top of the ground wire bundle into a loop and staple home to a post.
Electric fence
Your high tensile fence can be easily electrified using new high voltage, low impedance type energizers. The construction methods described for non-electric fences also apply to electric fences with one important exception. Energized wires must be insulated from the post; The need for insulation makes it necessary to plan for electrification before you begin construction. For specific help on energizer selection see Energizer guide.

Ruffin Prevost / Yellowstone Gate
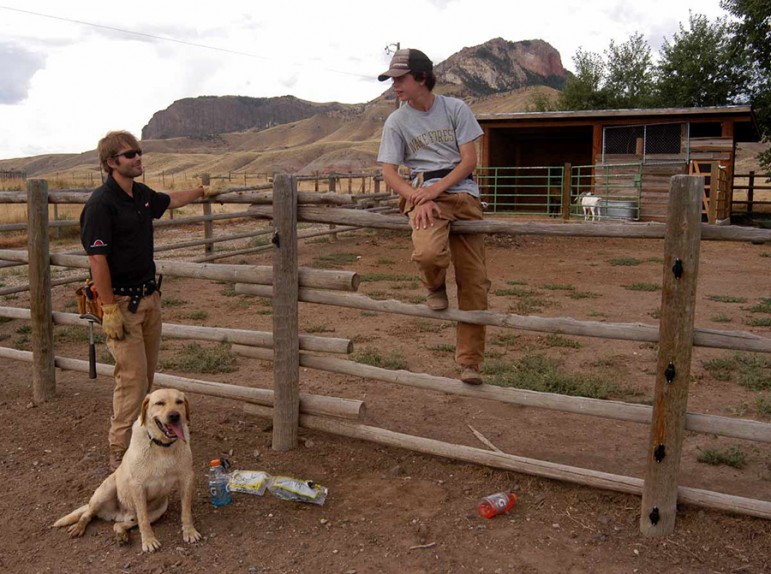
P.J. Schneider, right, and dog Dexter take a break while installing an electric fence last month with Russ Talmo. Defenders of wildlife helped Schneider with cost-sharing and technical expertise on the project at a ranch southwest of Cody, Wyo. where chickens and goats could attract grizzly bears.
CODY, WYO. — As the long, hot days of summer give way to cooler fall weather, bears across the greater Yellowstone area begin to binge on every available food source in preparation for winter hibernation.
That typically brings increased conflicts with people, as bears become single-minded in their pursuit of calories, pushing into more populated areas and spending more of their time searching for a meal.
Which is one reason why P.J. Schneider, 15, was busy last month installing an electric fence around a pen and small shed where he keeps 14 chickens and three goats.
Schneider lives on a rural ranch property east of Yellowstone National Park and 15 miles southwest of Cody. It’s an area frequented by grizzly bears, especially in spring and fall.
Though he hasn’t had any trouble with bears yet, Schneider said he wanted to get his fence finished before there was a conflict.
“That’s the time to take care of this, before there’s any problem,” said Russ Talmo, a field technician with Defenders of Wildlife who installs dozens of electric fences each year in bear habitat around Yellowstone.
Talmo was helping Schneider set up new a fence as part of a program sponsored by Defenders of Wildlife that provides funding, on-site assistance and consulting expertise for anyone looking to install electric fencing aimed at keeping bears away from attractants.
Lately, that has meant fencing chicken coops. Lots and lots of chicken coops.
Chickens have become increasingly popular on large and small rural and suburban properties across bear country in recent years, Talmo said.
“It just seems like everybody’s got them now, and between the chickens and their feed, they have a really high potential to be a source of conflict,” he said.
Talmo installs as many as 50 electric fences each year as part of the Defenders of Wildlife program, and about 80 percent of those are for chicken coops. He consults and advises on dozens of other do-it-yourself fences.
Defenders of Wildlife will reimburse landowners for up to 50 percent of the cost of the fence, which typically runs about $250, he said.
For Schneider, an independent and handy ranch kid whose father died unexpectedly a few years ago, Talmo’s expertise was just as important as the cost savings.
“I knew how to do most of the fence, but I would never know how to do the solar panels or run it through the gate,” Schneider said. “He saved me a lot of time showing me the best way to build it.”
A bear-proof electric fence is a weekend project most people can handle with a little guidance, said Cathy Roes of Midwest Fence, which supplied materials for Schneider’s project.
Roes said her company offers free instructional materials that make the job easier, something Defenders also does for those seeking specifics on fencing out bears.
Though the electric jolt delivered by a bear fence is greater than is typical for fencing in cattle or horses, it’s not fatal for Schneider’s goats, which he keeps for milk and to help with weeds.
For more information on the Defenders of Wildlife fence program, call 406-728-8800 or email rtalmo@defenders.org.
Talmo said the fence also keeps out coyotes, wolves and other predators that might be drawn to the chickens. Schneider sells eggs to neighbors and is interested in ranching, having helped raise bison on the same property with his late father.
While no fence is 100 percent bear-proof, a properly installed and maintained electric fence is a simple, effective way to keep even the largest grizzly away from chickens, Talmo said. The program also covers fencing around gardens, fruit trees or virtually any potential bear attractant.
Contact Ruffin Prevost at 307-213-9818 or ruffin@yellowstonegate.com.


