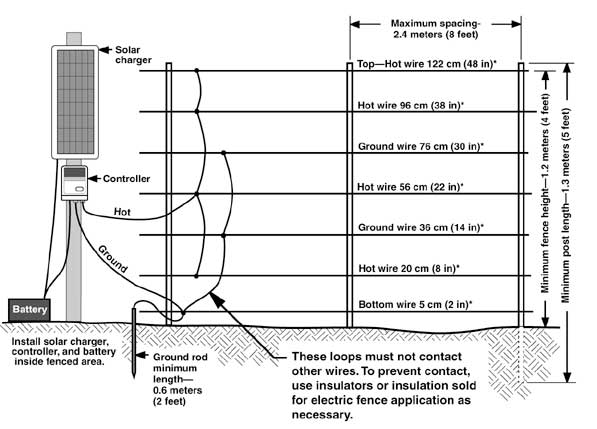
July 12, 2015

How do I control feral hogs?

Josh Gaskamp

Feral hogs are a source of misery for many land managers. They eat nearly anything and destroy valuable cropland, urban landscapes, and wildlife habitats and populations in the process.

They also contaminate water supplies and spread disease to wildlife, livestock and humans.

The feral hog’s reproductive potential requires more than 70 percent of the population to be removed every year. One sow can have up to 15 piglets in one litter, and the average litter size is six.

Feral hogs can produce up to two litters per year, and female piglets are capable of breeding at 6 to 8 months old.

Because feral hogs are so prolific and populations are so widespread, landowners either already have a problem or will have one soon. The best time to start controlling feral hog numbers is the day the first one shows up.

Unfortunately, many landowners have already passed this point and population control now takes more effort. There is a diverse set of control strategies for feral hogs, some more effective than others, and each is best suited to particular areas or situations.

Hunting

Methods used to hunt feral hogs may be the most experimented of all techniques. Over centuries, hunters have manipulated their hunting practices to become more effective.

Some strategies for hunting feral hogs are incidental take, using night vision and thermal scopes, hunting with tracking and catch dogs, and following Judas hogs.

In general, hunting is one of the least effective techniques for controlling hogs at the population level but can be used effectively if populations are just emerging.

Feral hogs scatter quickly when fired upon or chased by hunting dogs, making it difficult to remove additional animals after the initial bout.

The Judas technique is implemented by affixing a radio collar to one hog and taking advantage of its gregarious behavior to locate other hogs in the area.

Snaring

In states where snaring is legal, state trappers often use the technique because it is cheap and easy. Snare lines can be run very quickly by pickup truck or ATV, so hundreds of snares may be placed along several miles of fencing.

Disadvantages to the technique include the fact that once a snare captures an animal, the snare is often damaged and unusable, and non-target animals can be captured and injured by snares.

Snare placement takes a lot of experience to minimize injuries to non-target animals. State laws often require snare lines to be checked at least once every 24 hours.

Aerial shooting

Aerial gunning can be fairly effective but should be implemented over large areas (a few thousand acres), requires a helicopter (expensive) and can be relatively dangerous considering the necessary low altitudes and slow speed.

Additionally, feral hogs may learn to avoid open areas when helicopters are present, hunkering down in dense vegetation.

Gunners may not be able to see through dense woody cover during the growing season or in areas with abundant evergreen trees, so this method may be restricted to winter months in areas with deciduous woodlands.

Aerial gunning works best when implemented on large cropland acreages where hogs have few places to hide.

Trapping

Trapping is probably the most effective feral hog control technique available to most land managers. However, trapping is an art; if not done properly, it provides opportunities for hogs to become educated to the dangers of traps.

Trappers should be strategic and disciplined so failures are minimal. Feral hogs are smart and will learn from failed attempts to trap them.

Some traps carry a higher risk of educating hogs than others. For example, box traps are often too small to contain an entire sounder of hogs, so hogs left outside the box traps when triggered witness the dangers of box traps.

Corral and box traps are often animal-activated, meaning the traps can accidentally capture non-target species or can be triggered after only a portion of a sounder has entered the trap. Several strategies can be used to mitigate some of these events, but few work every time.

A great deal of research has been invested in developing better traps that are remotely human-activated in order to allow the user to control trap deployment and eliminate non-target captures.

The electronics that allow remote observation and triggering are handy but do nothing to ensure hogs are comfortable entering the trap.

Therefore, research has also been done to develop traps that work to avoid trap shyness. Drop-nets (nets suspended in the air) avoid trap shyness but are not practical for most land managers.

Using drop-nets as the brainchild, The Samuel Roberts Noble Foundation developed the BoarBuster, a suspended corral trap.

The BoarBuster feral trap

The BoarBuster is completely suspended with no panels at ground level or door thresholds for hogs to cross, reducing trap shyness and making it possible to trap entire sounders remotely.

In addition to trap selection, several fundamentals should be considered when trapping. Bait placement is extremely important. A location where damage is observed is not always the best location to bait.

By placing bait near their daytime bedding areas, the bait is the first thing hogs encounter when they head out to feed, making them easier to pattern.

Always pre-bait a trap site. Pre-baiting means providing a consistent food source days before erecting a trap. Pre-bait for a minimum of three days and only provide enough bait for hogs to consume in 30 minutes.

When the quantity of bait is limited, all individuals in the sounder are forced to eat immediately or risk not getting anything. Later, when traps are set, there is a better chance of catching the entire sounder when the hogs are conditioned to hurry to the bait.

Infrared-triggered cameras are tremendous tools for trappers. They provide information to help select the appropriate control technique and trap size. If only one hog is using the bait, hunting may be the proper strategy.

Alternatively, if a large group is using the bait, a trap should be large enough to capture the entire sounder. Using several of these techniques in an integrated fashion offers the best opportunity to learn and will contribute to the success of future control efforts.  end mark

PHOTO: The BoarBuster feral trap combines overhead nets and corral systems. Photo courtesy of Noble Foundation.

Written by Josh Gaskamp Published on 25 Jun 2015

July 10, 2015

Livestock scales measure animal performance

Squeeze chute on top of a weight pad

Livestock platform scales are viewed as a luxury by some cattlemen, while others consider them a necessary piece of equipment.

Their importance depends upon ranch management goals and selected herd performance measurements.

“Weights at birth, weaning and yearling ages are important expected progeny difference (EPD) measurements, so livestock scales are a must for seedstock producers,” says Dr. Rick Machen, Texas AgriLife livestock extension specialist at Uvalde.

“Scales will probably pay for themselves on large commercial operations if dewormers or antibiotics are used on a regular basis,” says Dr. Joe Paschal with Texas AgriLife extension service at Corpus Christi.

“These medications require an animal’s actual or estimated weight for dosage calculation. Scales can provide cost savings in preventing either overdosing or by preventing increased morbidity due to underdosing.”

A scale indicator with digital read-out

Desired weights

“The ability to measure performance is a key component in all beef cow operations,” write John Arthington and James Stice.

“Regardless of size, producers must be able to identify the current status of their operation in order to make adjustments toward improvement.

Cow culling is a key management tool for herd improvement. Being able to identify the poorer-producing cows within a herd is essential.”

“It’s a good idea to weigh cattle every time they are worked, but the most important weights are birth and weaning,” says Paschal. “Birth weight is one of the factors that determine calving ease, but more importantly, birthweight is the starting point for measuring growth.

The difference between birth and weaning weights is a measure of the cow’s ability to raise a good calf. These weights help identify cows for culling and indicate whether calves have received the right nutrition.

Weaning weights may indicate a need for creep-feeding calves or improving genetics in the cowherd. If calves are sold at weaning, their weight is important at this production stage because it determines their market value.”

“Weaning weight is one of the most important, although most abused, measurements of cowherd performance,” write Arthington and Stice.

“Weaning weight is calculated in many ways; therefore, it is essential that a producer understand the method of calculation when attempting to estimate his or her production efficiency.

A scale indicator with digital readout mounted in waterproof box on side of barn a few feet away from squeeze chute.

“Calf age is an important consideration when calculating weaning weight.

Significant variation in weaning age or breeding season can affect the reliability of using weaning weight to measure cowherd productivity.

One method of accounting for this variation is adjusting weaning weight to a constant age. A commonly used weaning age adjustment is 205 days.

To adjust, simply calculate calf gain by subtracting the calf’s birth weight from its actual weaning weight.

Then divide calf gain by calf age in days. This will be the average daily gain (ADG). Finally multiply ADG by 205 days for a uniform adjustment based on age of the calf. To do this, it is important to know the birthdate of each calf.”

“It is recommended that cows be weighed at the same time as calves,” write Tom Troxel and Bill Wallace. “The cow weight is used to calculate weaning percentage of their bodyweight.

Generally, cows that wean a high percentage of their bodyweight are more efficient and profitable than cows that wean a low percentage.

A load sensor attached to the bottom of a squeeze chute

“Weaning percentage is the calf’s adjusted 205-day weight divided by the cow weight times 100.

Mature cows should wean 50 percent of their bodyweight when their calves are 205 days old.

As cows have increased in size, it has become harder to accomplish that goal.

A 1,000-pound cow will more likely wean a 500-pound calf than a 1,400-pound cow weaning a 700 pound calf (205-day adjusted weight).”

“As cow size increases, the efficiency percent usually decreases,” write Troxel and Wallace. “There’s also a negative relationship between efficiency percent and calf breakeven (cost of producing a pound of beef).

As efficiency percent goes down, calf breakeven goes up. The efficiency percent calculation is very important. A cattle producer would more likely want to keep a replacement heifer from a cow that weaned 50 percent of her bodyweight than one that weaned 38 percent of her bodyweight.”

Types of scales

“Livestock platform scales are composed of three primary parts – indicator, platform and load bars,” says Terrell Miller of Cattlesoft Inc. “Indicators for platform scales come in various degrees of sophistication and in three different price categories.

The most economical indicators, currently costing between $700 and $800, are read manually. Weights are taken from the indicator and recorded on a pad, spreadsheet or notebook. They can also be entered manually into a computer.”

Miller usually recommends an indicator from the middle price range and sells the most units from this group.

These indicators, costing between $1,200 and $1,500, are ideal for basic weighing with electronic identification reader integration. They have internal memory that can be downloaded into a computer format for additional analysis.

The connection for a scale's cable from the indicator to the load sensor. It is mounted at the bottom of the chute.

Indicators ranging in price from $2,000 to $5,000 are the most expensive and comprehensive.

They allow recording and viewing complete animal history while cattle are being weighed. Reports and graphs can be designed right on the indicators.

Load bars, containing sensors, are designed for use with platforms, crates, cages, in alleyways or in squeeze chutes. They currently cost between $1,100 and $1,800.

“If a producer doesn’t mount their load bars under a squeeze chute, a weighing platform is needed which adds another $500 to $700 to the scale price,” says Miller. “Weighing platforms are usually made of aluminum with skid-resistant surfaces. The aluminum makes them durable, lightweight and easy to clean.”

Livestock platform scales are beneficial technology for cow-calf operations if a ranch is large enough to produce a positive return on the investment.

The purchase price must fit the ranch budget and the scale must result in a positive change in profits for it to be a wise buying decision.  end_mark

References omitted due to space but are available upon request.Click here to email an editor.

PHOTOS

1. A squeeze chute with sensor bars underneath.

2. A scale indicator with digital read-out.

3. Indicator mounted in waterproof box on side of barn a few feet away from squeeze chute.

4. A load sensor attached to bottom of squeeze chute.

5. The connection for cable from indicator. Photos courtesy of Robert Fears.

Written by Robert Fears Published on 24 May 2012

    July 09, 2015

    Important things to consider when weighing cattle

     Weighing a cow

    Using electronic scales to track weight gain efficiency not only takes some of the guesswork out of raising cattle by having a better handle on growth rates, but it can also make beef producers potentially more profitable and efficient.

    To ensure you are getting the most out of your livestock scales, keep in mind the following tips:

    1. Determine goals and sorting guidelines

    Consider how you will use your weight data. In order for a livestock scale to be effective, a goal must be determined to assess why you are weighing. Common goals of weighing livestock include:

    • Achieve correct dosage
    • Monitor weight gain
    • Monitor feed efficiency

    In order for any goal to be achieved or improved, it must be measured. With your chosen goals, determine what information you will need from your weight display indicator in order to measure them.

    Do you need just live-weight information, or will you need electronic identification (EID) recording capability and other advanced data capabilities? This will help determine what type of weight display indicator you will need.

    It is also a good idea to have pre-determined sorting guidelines prior to weighing. What will you do with an animal that is considered overweight or underweight? Determining these guidelines prior to weighing, and communicating them with others you are working with, will help make the weighing process much more efficient.

    2. Portable or permanent

    There is no right or wrong answer here. Whatever fits your management goals will determine what type of scale you need. One benefit of a permanent scale is that you can essentially set it and forget it.

    Once the scale is set up and mounted in place, you don’t have to worry about the scale moving or sliding. A portable scale, however, has multiple uses in multiple locations. It has been found that a scale that can be moved easily is a scale that will be used more often.

    There are three parts to a livestock scale system: the load cells, a weight display indicator and a platform or squeeze chute. Depending on your weighing goals and type of setup, either permanent or portable, will determine what type of scale system components you need.

    3. Place scale on a firm surface

    To optimize safety and accuracy, ensure the scale is placed on a firm surface. If your scale is not on a firm surface, the scale can physically move or shift while weighing and display an inaccurate weight as a result.

    Please note that a firm surface does not mean the surface needs to be completely level, especially if it is a portable scale. Livestock scales can be used on pastureground or gravel surfaces and still read accurately.

    4. Positioning load cell cables

    Pinched or twisted load cell cables can adversely affect the outcome of the weight reading. To ensure an accurate reading, make sure load cell cables are coming out straight from the load cells underneath the platform.

    It is a good idea to mount the load cell cables in a coiled fashion out of the way from animal reach and human traffic.

    5. Electricity nearby

    If your weight display indicator requires AC/DC power, make sure there is an electricity source nearby before setting your scale platform in place. For safety reasons, keep extension cord length as short as possible and be sure to keep the area as dry as possible.

    6. Chute-side table

    Once an animal enters the scale, it is important to move quickly. This reduces stress and potential shrink on the animal. Research has shown for every half-hour spent sorting and loading cattle, their weight will shrink by up to 0.5 percent.

    For a 1,000-pound steer, that’s 5 pounds lost per half-hour. Multiply that over a herd of 100 head, and you could be missing out on an extra 500 pounds of live weight.

    It is common to have a chute-side table for all necessary tools (i.e., tagging equipment, vaccination equipment, etc.). With a chute-side table, everything is nearby and within reach when an animal enters the scale.

    Having all necessary tools within arm’s reach will drastically lower chute time and the amount of stress on the animal.

    7. Scale interference

    Is anything touching your scale and interfering with the scale surface? Scale interference can cause weighing inaccuracies. Make sure your scale is clear of manure, large rocks and other debris prior to weighing in order to keep weighing as accurate and efficient as possible.

    Evaluating this checklist prior to weighing cattle will help minimize chute time, in addition to collecting accurate data that can be implemented to improve efficiencies.  end mark

    For more information, contact Nicole Turner by email or at (920) 568-6276.

    PHOTO: If the weight display indicator requires plug-in power, make sure an outlet is near and dry. Photo courtesy of Digi-Star.

    Nicole Turner
    • Nicole Turner

    • Livestock Scale Product Manager and Technical Consultant
    • Digi-Star
    • Email Nicole Turner
    • Written by Nicole Turner Published on 25 Jun 2015

    June 17, 2015

    Gallagher USA Extends Solar Options with New Compact Energizer

    New Advanced, Portable Solar Energizer

    ​​​​KANSAS CITY, MO - The S10 S​olar Energizer is the newest member of the Gallagher Solar Energizer Line-up.  This compact, robust solar energizer that comes with a rechargeable battery and solar panel is a convenient and cost-effective alternative to battery-powered energizers.​

    The S10 powers up to 3 miles and boasts several customer inspired improvements that make it ideal for strip grazing, garden protection, livestock and pet containment.

    Because it uses solar power, it doesn't require a constant supply of batteries to keep it functioning, said Terry Cole, Product Manager for Gallagher North America. 

    "But it's the S10's ease of use that really sets it apart. It's incredibly simple to set up and operate. You hook it up to the fence and ground rod, turn it on and walk away."

    Once activated, the S10 will continue to operate for up to three weeks without sun. An easily visible LED Pulse Indicator shows the Energizer is working and has enough charge. A red light flashes if the battery is low. The waterproof and drop resistant casing is made to last extreme conditions and the S10 Energizer is equipped with in-built lightning protection.

    "And it's very easy to move the S10 from one fence to another. It's only has one control switch, so you don't have to be expert in electric fencing to operate it."

    The S10 can be used in both portable and permanent electric fencing applications.  The optional portable post mount allows attachment to temporary fence posts.  For longer term electric fencing scenarios such as protecting silage bales, trees and riparian areas etc., the S10 can be attached to a wooden post or sit on top of a steel post.  The steel post mount allows for 360 degree placement so that the solar panel can be easily positioned south towards the sun, regardless of which way the post is facing.

    Consumers looking to get the most out of solar energy can rely on Gallagher's S10 Solar Energizer​ to provide dependable, pasture, livestock and pet protection in all weather conditions with many animal types.

    June 04, 2015

    How to Select, Install Electric Fence

    Advice from an electric-fencing expert on selecting and installing it for maximum security and safety for your horse. Plus, a maintenance checklist for you. By Bob Kingsbery with Sandra Cooke for Practical Horseman magazine.


    By Bob Kingsbery With Sandra Cooke

    When you need to build a new fence or replace an existing one, there's a major reason for using electric fence: Properly selected, installed and maintained, it's the most effective way to safely contain your horse. It's also economical and easy to install and maintain. Let's look at the basic components of an electric fence and how to avoid common problems.

    Key Electric Fence Components
    Charger. Sometimes also called an energizer or fencer, the charger needs to be powerful enough to deliver a definite jolt when your horse touches it, even when its current is reduced by vegetation touching the fence line or (as sometimes happens) by moist, dewy early-morning conditions.

    Ignore chargers whose power is rated by miles; look instead for one rated by joules, a measure of the oomph with which the charger is pulsing its thousands of volts of current through the fence once every second. One joule is a minimum rating for fencing that encloses up to five acres, but I always recommend getting the most powerful charger you can afford. A higher joule rating doesn't mean the fence's jolt--which can't injure horses or other animals--will be harder or more painful, but that it will be more consistent.

    The difference in cost will be insignificant compared to the value of your horses and your peace of mind; expect to pay $100 to $120 for a good one-joule charger that plugs into an outlet in the barn or elsewhere; six-joule chargers now sell for less than $200, a small premium for peace of mind. (Worried about your electric bill? Fence chargers use negligible amounts of power, whatever their rating.) I recommend solar-powered chargers--about three times as expensive as the plug-in type--only for paddocks where 110-volt power is unavailable; as well as delivering relatively low power for their cost, they're susceptible to failure.

    It's possible to run insulated cable up to 1/4 mile from a charger to the fence without significant power loss. Install the charger under cover (except for solar-powered chargers, of course), where you can check it easily during each day's routine. Most chargers have a light that flashes with the electric pulse when they're plugged in and functioning.

    Ground system. This is a series of three 6-foot-long, galvanized-steel rods pounded into the ground 10 feet apart and connected by insulated cable (see below) to the "ground" terminal on the fence charger. (In areas where soil is very dry, more than three rods may be needed.) Assuming that you have a good charger, the ground system is the key to your electric fence's effectiveness. If your horse touches the fence, he feels a jolt only when the brief pulse of electric current that goes through his body and into the ground is picked up by the ground system and returned to the fence charger, completing the circuit. Be sure to use a ground rod clamp to attach the ground wire as tightly as possible to the rod, rather than just wrapping it around.

    Insulated cable. The cable that carries the electric pulse from the charger to the fence needs to be specifically for electric fence, with insulation rated for up to 20,000 volts (most fence chargers emit from 5000 to 10,000 volts)--the same degree of insulation as on automobile spark plugs. By using cable designed for electric fence, you avoid the electricity leakage that results when you connect the charger to the fence with heavy-duty household electric cable, whose insulation is rated for only 600 volts.

    When attaching the cable to the fence itself, use a connector clamp rather than just wrapping the cable wire around the fence; cable connected by wrapping comes loose more easily or loses power due to oxidation or corrosion buildup. All fence manufacturers sell a connector clamp designed to work optimally with their product. You'll also need the cable to carry the electric fence current from one side of a gate to the other: Connect all strands of the fence to the cable on the side of the gate nearest the charger.

    My preference is to then run the cable above the gate via an archway high enough to safely admit horses and paddock-maintenance equipment, but most people prefer to run the cable underground. That's fine as long as the cable is encased in waterproof plastic tubing, plugged at each end with silicone caulking and buried in an 18-inch-deep trench to protect it from damage by hooves and equipment. On the far side of the gate, use connector clamps to attach all strands of the fence to the cable.

    Cut-off switch(es). Save lots of extra steps by installing a weatherproof knife-type cut-off switch (sold in the electric fence section of farm stores) between the insulated cable and its attachment to the fence, enabling you to turn the fence off without going back to the barn to unplug the charger. I also like to install cut-off switches on both sides of a gate--multiple cut-off switches allow you to isolate sections of the fence for easier trouble-shooting.

    The fence itself. Visibility is key to an electric fence's effectiveness and safety. Materials such as 1.5- or 2-inch poly tape, braid, rope or coated HT wire make the fence easy for your horse to see and avoid. (Thinner fence materials such as poly wire or 1/2-inch poly tape are suitable for temporary installations or as a "hot wire" to keep horses away from solid fence; uncoated electrified wire--although dangerous when used as a fence material on its own--can also be used to protect solid fence.)
    Choose a product with a long warranty (for instance, some fence materials have a guaranteed lifetime of 20 years) and follow the manufacturer's recommendations for number and spacing of strands. A good general rule of thumb is four to five strands of fence, 4 to 4.5 feet high, for perimeter fences and three to four strands for interior fences. Space the top two or three strands no more than 12 to 14 inches apart and the lower strands 18 inches apart, with the lowest strand 18 inches from the ground to minimize interference by grass and weeds.

    Insulators. The type of insulator you need (to hold the fence material on the post that supports it, while preventing the fence from contacting any surface that will cause current to leak) is determined by your choice of electric fence; most manufacturers market insulators specifically suited to their fence products. In general, braid, rope, and coated wire are installed on insulators that allow the fence to slide through. To help prevent chafe and wear on a tape fence, however, insulators need to be the type that clamps and immobilizes the tape (especially important in windy areas), and to be installed vertically on the fence post. Avoid cheap "generic" insulators (often made of brittle plastic), which only last a few years.

    Testing, Testing... Why It's Important
    When your electric fence is built, monitoring its voltage regularly--I recommend daily--is a basic management practice, just like checking water buckets. Use a digital voltmeter that tells you exactly how many volts of current are on the fence. (How many volts are enough? Four thousand to 5,000--remember, there's no way this jolt of current can hurt your horse, but it needs to be definite enough for him to remember it and want to avoid it.)

    Your first check of your new fence's voltage gives you a baseline so that future checks can alert you to voltage drops that signal problems. Depending on the strength of your charger, it will emit 6000 to 10,000 volts when nothing is connected to it. After you've hooked it to your fence, check the voltage at the furthest point from the charger. Some drop in voltage--1500 to 2000--is normal. A more than 2000-volt drop means either your charger is underpowered for the fence, vegetation or something else is "loading" the fence (touching it, causing voltage to leak away), there's a short-circuit somewhere in the system--or a combination of these.

    If the base voltage on your newly built fence is 4000 or better and everything's working fine, watch on subsequent checks for an overall voltage drop of 1500 or more. (It's normal for voltage to be 500-1000 lower in the morning when moisture on the fence, posts, and nearby vegetation can cause temporary current leakage.) Such a significant decrease means it's time to check for problems and correct them before your horse discovers the fence no longer packs a punch; in fact, many horses can sense when the fence is or isn't functioning.

    Electric Fence Maintenance Checklist
  • Look for and remove sources of "load." Mow or trim under bottom strand to prevent grass and weeds from touching the fence; watch for fallen limbs or other objects on the fence or caught in insulators. (Tips: Listen for the rhythmic snap that indicates a voltage leak; follow your ears to find the source. Drag a long stick on the ground beneath the bottom strand as you walk the fence-line; it may knock away an interfering object you don't even see.)

  • Check insulators. A broken insulator can allow the fence strand to touch the post--not an immediate problem with a nonconductive wood post, but if you're using steel T-posts a broken insulator can cause the fence to go dead when the strand touches the metal.

  • Check connections. Ground-rod wires can get knocked or kicked away. Wires attaching the cable to the fence may come loose.

  • Check the charger. A spider's web built between terminals can cause it to spark.

  • Check insulated cable. Look for places where the cable may be abraded, for instance where it passes through a hole cut in metal barn siding.

  • Check fence strands: Look for frayed spots in poly tape--if metal fibers in the weave become separated, tape can't conduct current.

  • Texas-based international fence authority Bob Kingsbery grew up on a family-owned horse-breeding farm; he has written widely on electric fencing and has conducted more than 300 seminars on fence technology and grazing management throughout the world. You can reach him with your electric-fence questions via email at bob@kingsbery.com.This story originally appeared in the March 2004 issue of Practical Horseman magazine
    - See more at: http://practicalhorsemanmag.com/article/electricfence_021005#sthash.eBjkBqW9.dpuf

    June 02, 2015

    Save $500 on the Gallagher 610 Cattle Scale System

    June 02, 2015

    Is Your Multi-Wire Fence Too Much For Your Charger

    I’ve been asked a handful of times, “Is my multi wire set up too much stress for my fence charger?” Some manufactures rate their chargers in total linear length of wire, and some rate in single/multi wire, so it can be hard to figure out.

    So let’s look at an example:

    Let’s say you bought a fence charger rated up to 5 miles of single/multi wire of fence. You put up 5 strands of wire at 2 miles each, making 10 miles of of electric fence.

    So now you’re thinking to yourself, “Crap, I’ve got too much fence for my fence charger, now what do I do?”  Do you take down 3 of the wires and stay with 4 miles of total fence? You could, but then you just wasted all that extra time running the other wire. So what do you do?

    You leave all 10 miles of fence wire up and then take a jumper wire and tie all 5 wires together from top to bottom. I usually do this at both ends. Now what happens is that these wires are now parallel and they divide the resistance by 5, in theory.

    So you still physically have 10 miles of fence, but to the fence charger, it only feels one BIG 2-mile run of electric fence. Also by having them tied together at both ends, you have a better chance of keeping the wire together. If an animal breaks a wire loose from one end, at least it’s still tied together at the other end.

    Another thing you could do is have a ground return system. You could alternate 3 hot wires and 2 ground wires, or make the top 2 hot wires and the bottom 3 ground wires. Just choose the pattern you like. Then jumper the hot wires together with each other from top to bottom and do the same with ground wires. Then take a single wire and jumper it from one of the ground wires and connect it to the last ground rod.

    What you now is one BIG 2-mile run, but you now have a ground return system. If an animal comes in contact with both a hot wire and one of the ground wires, they’ll get the FULL BLAST from the charger. The animal could be floating in mid air, come across both wires and still get the shock of a lifetime. This set up works well for arid areas where the lack of soil moisture reduces grounding.

    Both of these set ups would work well for any set up, big or small. This is a way to run more hot wire without stressing the fence charger out.

    This is an example of alternating ground and hot wires with jumper wires tying them together.

    This is an example of alternating ground and hot wires with jumper wires tying them together.

    - See more at: http://onpasture.com/2015/05/25/is-your-multi-wire-fence-too-much-for-your-charger/#sthash.DFpz8T9J.dpuf

    May 04, 2015

    Feral Electric Fencing

    Mat Roberts says without the “dog fence”, they wouldn’t be able to farm sheep. “It really is that simple: Gallagher’s electric fence has been integral in our management of the wild dog predation.”
    Mat and his wife Lindy manage the 1,300-hectare property “Rose Valley”, in Victoria’s picturesque High Country. Some 650ha is cleared, with 450ha of that surrounded by external electric fencing. The other 200ha has electric fencing but the terrain and river mean it’s not enclosed in what they call “the dog fence”.
    The property’s previous owners, brothers Hugh and Rick Hoskins, first installed six kilometres of boundary electric fencing from Gallagher in 1994.
    Mat says, “They copped quite a hammering from dogs, and just couldn’t keep doing what they were doing. Once the dog fence was in, it completely turned their job around. That’s why after the 2006/7 fires, we extended it where boundary fence had been burnt on land we’d recently bought, and continued it around a further 202ha of grazing land. We now have 14km of boundary dog fence, and another 10km of internal electric fence to manage livestock and pasture.”
    Reduced stress, different focus

    “The dog fence is not a silver bullet for the wild dog problem — the dogs are still there, on the outside. It is, however, a fantastic tool that gives us the confidence to focus on other jobs, and not be stressing continually over wild dogs.
    “That’s a comment you hear often from people who are under impact from wild dogs: it’s just that continual waking up every day, with a sick-in-the-gut feeling of what disaster you’re going to find out in the paddock because of wild dogs. This Gallagher feral fence gives us peace of mind. We’ve still had incidents with wild dogs, but they’re minimal to the pre-fence days and certainly to what other people have.
    “Dog attacks knock you about. They’re a continual thing and become your all-encompassing focus, so other things don’t get done. The previous owners told us how the fence changed their lifestyle. We find the same — you can focus on other farm activities, or even lifestyle activities.”
    Gallagher experience a drawcard

    Mat says when they wanted to extend the boundary feral fencing and install internal fencing, they went back to Gallagher.
    “We knew through experience it worked. We didn’t look around. The property was running Gallagher gear and it’s been really good. Because we were relying so much on the fence, we’d come in contact with our local rep a bit, just with queries or questions or when we were doing changes or improvements, so we’d build a great relationship there, and with the stores — Rodwells in Mansfield, Hunters in Wangaratta and Tafco in Myrtleford.
    “When we built the extra dog fence, we wanted to make some improvements too. The rep came out and we tried different energisers and systems. It was a very good way of resolving what needed to be done.”
    Performance visible in an instant

    Mat and Lindy installed two M2800 i Series Energizer Systems, adding an extra two remote monitors on each (one comes standard).
    “This i Series, it enables us to just walk up to the shed, look at the screens on the energizer controllers, and we can tell straightaway how the fence is performing and if there are any issues with it. And that’s not just here at the shed, but through the monitors at remote points.
    “Our most important monitor is probably the one right at the end of the fence. It’s all very well sitting at the workshop knowing that there’s 7,000 volts here, but it’s great to know there’s also 7,000 volts at the far end of the fence, and that’s what the i Series allows us to do. If there’s any sort of breach from a tree or anything causing a short on the fence, it’ll show up.”
    Knowledge an advantage on conventional

    “That’s the point we often make: people say that with a conventional fence you don’t have an issue if a branch falls on it, or if something happens you don’t necessarily have to go straight down and fix it, because there’s no power to short on a conventional fence.
    “My answer to that is that with a conventional fence, you don’t know that branch is there until you physically go out around — in our case 14km of fence. With electric fencing, if there’s something, we’re aware of it and we can make an informed decision on how to manage it; we’re not flying blind.”
    Repair simpler

    Mat says another reason they chose electric fencing was its cost effectiveness to install and ease of repair. “This is a heavily treed area, so there are always trees that come down and so forth. From a repair point of view, it’s easier than a conventional netting or hinge-joint style of fence. Electric fencing just ticks all the boxes for us.”
    Mat says these are also the reasons they chose Gallagher for their internal electric fencing. “For stock management and pasture effectiveness, it’s great.”
    Maintenance key – and straightforward

    He says they aim to use the best components they can. “We know that how well the electric fence works is a direct reflection of how well it’s built in the first place, and then maintenance is as important as constructing it properly.
    “But we’re certainly more than happy to allocate time to maintaining it. It’s more than some people would do on their conventional fences, but then the benefits we get from maintaining that electric fence far outweigh the time.”
    The bottom hotwire is about 100 millimetres off the ground, but varies according to the terrain. “There’s a balance between having it too low, where grass can short it out; or too high, so it lets animals under.”
    Mat says an annual spray under the line for weeds and grass takes about three hours in spring — “it’s not a lot”. Strong autumn growth might see them needing a second spray.
    Reliability and relationship are strengths

    “The M2800 i Series Energizers obviously run on electronics, and there’s always the potential for electronics to go wrong, but these systems are just so reliable. “Also, the follow-up with the support we’ve had through our rep has been exceptional.
    “I guess that’s as important as the reliability of the machine, because anything can and will breakdown, it’s more how you deal with it — especially for the likes of us, who are relying on it heavily from the dog point of view.
    “We’re not kidding ourselves that the dog problem is all fixed because of the fence and we don’t have to pay attention any more. But it is a very successful tool for us. We certainly couldn’t do what we do without the fence. If the Hoskins brothers hadn’t built the original fence and had instead got out of sheep before we came in 2002, we would have assumed that this just wasn’t viable sheep country. The fence allows us to run sheep here, and enjoy this beautiful area, despite the dog problem.”

    April 03, 2015

    tools for building your electric fence

    we have a great selection of fencing tools for your farms electric fence. check out our website at www.gallagherelectricfence.com Its a great website for all kinds of electric fence products.

    Here are links to some tools you should have

    http://gallagherelectricfencing.com/collections/m-gallagher-fencing-tools

    Gallagher Fencing Tools Essential for Building Electric Fence Projects
    Gallagher provides a complete range of fence tools for any job including electric fencing tools, tumble wheels, fence pliers, crimp tools, wire cutters, spinning jennies, fence testers, chain grabs and wire dispensers.
    Free Gallagher Baseball Cap with every $500 Order!
    Gallagher Tumble Grazing Wheel 5 Pack G63800 Moveable Electric Fence
    GALLAGHER TUMBLE WHEEL 5 PACK
    $374.99
    Gallagher H.D. High Tensile Wire Spinning Jenny Electric Fence Tools
    GALLAGHER H.D. SPINNING JENNY
    $129.99 $144.99
    KFS High Tensile Fence Wire Spinning Jenny Unwinder
    KFS WIRE SPINNING JENNY
    $99.99
    Gallagher Rapid Wire Tightner Tool G645004 Electric Fence Strainer
    GALLAGHER RAPID WIRE-TIGHTENER TOOL
    $89.99 $99.99
    Gallagher / Maun Power Fence Pliers G52200
    GALLAGHER POWER FENCE PLIERS
    $79.99 $88.99
    Gallagher 2 Groove Electric fence Wire Crimp / Splice Tool A609A
    GALLAGHER 2 GROOVE WIRE SPLICE TOOL
    $74.99 $82.99
    Gallagher High Tensile Wire Spinning Jenny
    GALLAGHER SPINNING JENNY
    $69.99 $77.99
    Gallagher Digital Voltmeter Fence Tester G503014
    GALLAGHER DIGITAL VOLTMETER
    $49.99 $53.49
    4 SLOT ELECTRIC FENCE CRIMPING TOOL
    4 SLOT CRIMPING TOOL
    $49.99
    Gallagher Neon Light Voltage Tester G501004 | Electric Fence Voltmeter
    GALLAGHER NEON TESTER
    $47.99 $53.49
    Gallagher Live Lite Fence Voltage Indicator G51100
    NEW GALLAGHER LIVE LITE FENCE IN...
    $33.49
    FENCE ALERT Warning Light
    FENCE ALERT Warning Light
    $26.99
    Gallagher High Tensile Fence Wire Cutter G524
    GALLAGHER HI TENSILE WIRE CUTTER
    $19.99 $21.99
    Gallagher Spring Ratchet In-Line Strainer Handle Electric Fence Tool
    GALLAGHER IN-LINE STRAINER HANDL...
    $18.99 $19.99
    Gallagher In Line Strainer Wheel Tightner Handle A644
    GALLAGHER WHEEL TIGHTENER HANDLE
    $12.99 $14.49
    Gallagher 3 Hole Fence Wire Twister, Twisting Tool Electric Fencing
    GALLAGHER 3 HOLE WIRE TWISTER
    $5.99
    Ring Insulator Spinner | Electric Fence Insulators
    RING INSULATOR SPINNER
    $4.99
    Gallagher Electric Fence Warning Sign G602404
    Gallagher Electric Fence Warning...
    $3.49

    April 01, 2015

    What Does It Cost to Run a Fence Charger?

    Fence chargers only cost us pennies per day, folks tell us. Now here’s how you can figure how many pennies at your place.

    what_does_it_cost_to_run_a_fence_charger_13

    Editors Note: This comes to us from Steve Freeman’s Pasture Pro blog and was written by Gary Duncan. Gary has been active in the fence business for over 15 years. He also raises Highland cattle in a management intensive grazing system and was the first person to market the PasturePro post back in 2005.

    Over the years many people have asked me – how much is it going to cost to run my fence charger? I usually respond that it will be “pennies per month”, but this is pretty easy to compute yourself.

    The only thing you will need to know is how many watts your particular charger pulls and the kilowatt charge from your particular electric utility company. This is assuming that you have a standard mains unit that plugs into a standard 110V outlet.

    The basic equation is: watts x time / 1000 = kWh

    Watts = The watts per hour consumed by the electric fence charger during operation. This is probably not printed on the cover of the charger, but is usually on the box or the instruction manual that should come with it. If you don’t have the box or manual, then call the manufacturer and they should be able to tell you.

    Time = The amount of time the charger is operated. This should be calculated into hours per day and then days per month. Normal you will be running your charger on a continuous basis of 24/7 and the utility company billing period is normally for a 30 day period.

    1000 = Dividing by the number 1000 places the total into kilowatt-hours, which is what most utility companies use as the rate of consumption.

    Example:

    The power consumption of most chargers for agricultural / livestock control purposes will range from 10 watts up to 50 watts. One of the very largest ones will pull a maximum of 50 watts (I think that this will equate to running a 50 watt light bulb). Operating a 10 watt charger continuously for 24 hours per day for 30 days at a utility company rate of 10 cents per kilowatt-hour will equal:

    10 watts x 24 hours per day x 30 days / 1000 = 7.2 kilowatt-hours (kWh)

    7.2 kWh x 10 cents = 72 cents

    So $0.72 is the cost of operating the 10 watt charger for 30 days at this rate, or a whopping cost of $8.64 per year. Now you know how much your electric fencing system is costing you to run. Pretty cheap, huh? So cheap, in fact, that I am surprised that someone hasn’t put a tax on it !!

     By   /  March 30, 2015 

    - See more at: http://onpasture.com/2015/03/30/what-does-it-cost-to-run-a-fence-charger/#sthash.QABEGokQ.dpuf
    x

    x